


Fertility Acupressure Bead Protocol
*monthly subscription, cancel anytime*

Reduces impotence
Supports reproductive organ health
Regulates menstruation
Balances hormones
Includes

- Fertility Protocol How-To Guide
- 30-Day Supply of Acupressure Beads
- Medical-Grade Tweezers
Benefits
- Activates genital & breast arousal points
- Balances liver, stomach, kidneys, & spleen function
- Balances the mind
- Improves overall sexual organ health
- Increases blood flow to the genitalia
- Supports blood detoxification
- Improves libido
- Improves blood circulation
- Regulates menstruation, uterus function & vaginal discharge
- Increases fertility for men and women
- Increases libido, sperm count & fertility in men
- Reduces impotence & nocturnal emissions for men
How To Use
- Use tweezers or fingers to pull bead from the strip and place on pressure point.
- Press down firmly to secure bead.
- Remove beads after 3-5 days (beads may fall off naturally, which is normal).
Recommendations
- Apply beads to one side of the body at a time (left or right side).
- Place bead as accurately as possible, however, placement does not need to be precise to be effective.
- Throughout the day, press gently on beads for an extra boost.
- If skin becomes irritated, remove bead.
Read More
Alternative Names:
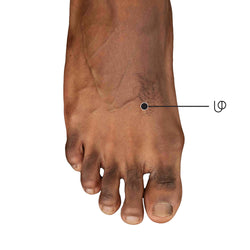
Find the Spot
2. Place the bead where the two bones meet.
Primary Function

Additional Function
X

Read More
Alternative Names:
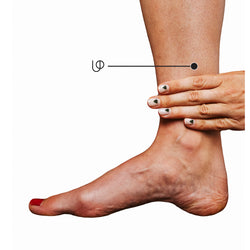
Find the Spot
2. Find the spot where the the thumb and index finger bones meet.
3. Move one finger's width above this point.
4. Place the bead at this spot on the edge of the index finger bone.
Primary Function
Additional Function
X
Read More
Alternative Names:
Find the Spot
2. Measure four finger widths above the ankle bone.
3. Place the bead on the edge of the shin bone (this area will often be tender).
Primary Function
Additional Function
X
Read More
Alternative Names:
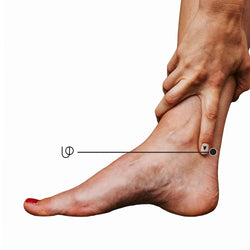
Find the Spot
2. Move one finger's width down from the ankle bone and one thumb's width towards the Achilles tendon (which runs down the back of your ankle).
3. Place the bead at this location on the edge of the Achilles tendon.
Primary Function
Additional Function
X
Read More
Alternative Names:
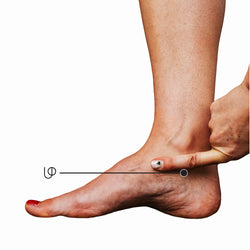
Find the Spot
2. Place the bead one finger width below the ankle bone.
Primary Function
Additional Function
X
Read More
Alternative Names:
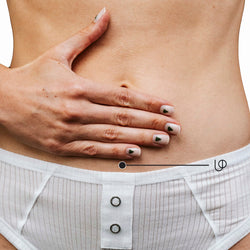
Find the Spot
2. Place the bead four finger widths below the belly button in line with the belly button.
Primary Function
Additional Function
X

Read More
Alternative Names:
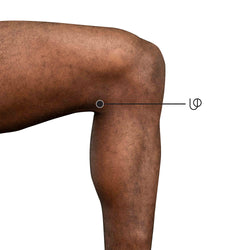
Find the Spot
2. Using the pointer finger and thumb, measure the kneecap (thumb on top of kneecap, pointer finger on bottom of kneecap).
3. Using the same measurement, shift your pointer finger and thumb up the knee until the pointer finger is at the top of the kneecap.
4. Rotate the thumb 45 degrees towards the inside of the leg.
5. Place the bead at this location.
Primary Function
Additional Function
X
Read More
Alternative Names:
Find the Spot
2. Locate the crease behind the knee.
3. Place the bead in the soft spot on the inside of the crease between the tendon and ligament.
Primary Function
Additional Function
X
Read More
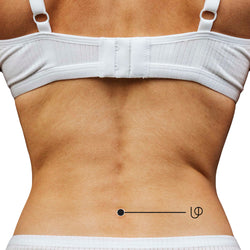
Find the Spot
2. Count up to the second and third vertebrae from the bottom of the spine.
3. Place the bead between these vertebrae, roughly opposite of the belly button.
Primary Function
Additional Function
X